JpGraph PDF417 Barcode Manual

1 Apr, 2005
Table of Contents
1 Principle of PDF417 Barcodes 2 PDF-417 2D Barcodes with JpGraph
- 2.1 Introduction
- 2.2 Features
- 2.3 Creating barcodes - Quick start
- 2.4 Specifying the PDF417 parameters
- 2.4.1 Specifying encoding and input data
- 2.4.2 Adjusting the number of data columns
- 2.4.3 Adjusting the error level
- 2.4.4 Truncated PDF417
- 2.5 Adjusting the output
- 2.6 Putting it all together
- 3.1 Encoder methods
- 3.1.1 PDF417Barcode($aNumCols=10,$aErrLevel=2)
- 3.1.2 SetColumns($aCols)
- 3.1.3 SetErrLevel($aErrLevel)
- 3.1.4 SetTruncated($aTrunc=true)
- 3.2 Backend methods
- 4.1 Example 1: Default values
- 4.2 Example 2: Basic parameter settings
- 4.3 Example 3: Showing human readable text
- 4.4 Example 4: Altering colors
- 4.5 Example 5: Creating postscript output
- 4.6 Example 6: Manually selecting compaction schema
1 Principle of PDF417 Barcodes
This first chapter give a very brief explanation of the general structure of PDF417 barcodes and gives some capacity figures.
1.1 PDF417 standard
The PDF417 is a modern high capacity barcode and is fully described in the official standard ISO/IEC 15438:2001 available for purchase from ISO Standard Organization. As for a standard this is actually a quite readable document.
1.2 Data capacity
PDF417 is a row based 2 dimensional barcode that consists of a maximum of 90 rows and 30 columns. The maximum number of data is dependent on
- The compaction mode used
- The number of columns (and rows)
- The error correction level
- 2710 digits in numeric compaction mode
- 1850 characters in text compaction mode
- 1108 bytes in byte compaction mode
1.3 Structure of PDF417 barcodes
Each PDF417 barcode is built up according to the following principle
| Start pattern | Left row indicator | Data count | Datawords | Right row indicator | Stop pattern |
|---|---|---|---|---|---|
| Start pattern | Left row indicator | Datawords | Right row indicator | Stop pattern | |
| [....] | |||||
| Start pattern | Left row indicator | Datawords | Right row indicator | Stop pattern | |
| Start pattern | Left row indicator | Datawords | Error correction | Right row indicator | Stop pattern |
Each dataword (symbol character) consists of 4 bars and four spaces in a 17 module structure, hence the name PDF417. The figure below explains the different parts of a full PDF417 barcode.
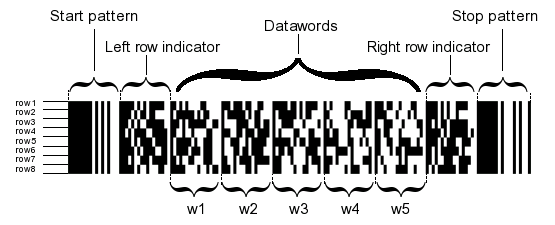
Figure 0. The details of a PDF417 barcode. The
above barcode uses 5 columns of data and encodes the string "PDF417"
with error correction level 4.
The data to be converted into a barcode has to go through a number of steps which are handled by the library
- The first step is a high level compression schema known as compaction. This schema translates the input string into a number of codewords. Each codeword has a numeric value between 0 and 928. To achieve the highest possible compaction and flexibility the PDF417 standard defined three different compaction schemas, numeric (which only encodes digits), text (which encodes ASCII 32-126) and byte (encodes ASCII 0-255). The numeric schema compact up to 2.9 digits per codeword, the text mode up to 1.8 characters per codeword and finally the byte mode up to 1.2 bytes per codeword.
- The second step is the transformation of codeword into (4,17) symbols. The exact symbol used is dependent on which row the codeword to be encoded is on. Three different sets of codewords, known as clusters, are used. This ensures that two adjacent rows uses different clusters. This allows the barcode to be scanned without using specific divider symbols.
- In the third step the error codewords specified are calculated and added to the end of the payload data. The error correction uses polynomial Reed-Solomon coding which is one of the best currently known codes counted as effort vs efficiency (i.e. error correcting ability vs the computational effort to handle the codes). (The actual algorithm is a non-trivial process and readers interested in pursuing this is best recommended to consult one of the numerous mathematical textbooks covering this area.)
- Finally these codeword are layed out in the specified rows, the left and right row indicators calculated and the the start and stop patterns added.
All these steps are are completely transparent to the user of the library and is only explained here as a background reading.
2 PDF-417 2D Barcodes with JpGraph
2.1 Introduction
With the PDF-417 2D barcode extension to JpGraph you can create 2-Dimensional PDF417 barcodes. These are high capacity barcodes and has excellent (user selectable) error detection and correction built-in. PDF417 barcodes can be created as an image (in either PNG or JPEG format) or as a Postscript file ready for printing on high resolution printers.
In addition the barcode extension provides extensive data verification which makes sure you can't create an invalid barcode.
2.1.1 Verification
The JpGraph PDF417 barcodem module have been extensively verified using an ARGOX 8213 2D CCD handheld scanner.
2.2 Features
This is a summary of the features available in the JpGraph PDF417 barcode extension.
- Supports both standard and truncated PDF 417 codes
- Output format
- Image format, either JPEG or PNG
- Postscript
- Encapsulated postscript
- Supports both auto and user selectable number of columns and rows
- Support all 8 possible error correction levels as specified in the official PDF-417 specifications
- Supports all defined compaction schemes, Alpha, Numeric and Byte. In addition the library has an auto-detection algorithm that can automatically detect the best possible encoding given a specific input data.
- User specified module hight
- User specified module width factor
- User specified scaling of resulting barcode
- Horizontal or vertical barcode layout
- Optional human readable text on barcodes
- Foreground and background color specification
2.2.1 Sample application
Even though primarily the JpGraph 2D PDF-417 barcodes are meant, and designed, to be used as a library within a larger system there is a small demo barcode creation application included in the distribution. This application can be used to easily create barcode through it's WEB interface.
This application is primarily included as a demo on the features available in the library and not as a finalized product.
You can find the application in the "pdf417demoapp/" subdirectory in the distribution. Or by using this this link.
2.2.2 Examples
A number of small example script that creates various versions of PDF-417 barcodes can be found in the "pdf417examples/" directory in the distribution.
2.3 Creating barcodes - Quick start
All barcode creation follows the following simple steps :
- Include the necessary library modules in your script jpgraph.php and jpgraph_pdf417.php.
- Create an encoder with the chosen PDF-417 layout (number of columns)
- Create a backend for your chosen output format (image or postscript)
- Encode your data
So, for example to create a barcode (in PNG format) representing the
data string "PDF-417" encoded in PDF-417 using default number of
columns and the default error detection level you would just have to
create the script
 // Setup some data

$data = 'PDF-417';

// Create a new encoder and backend
 to generate PNG images

$encoder
 = new PDF417Barcode
();

$backend
 = PDF417BackendFactory
::Create(BACKEND_IMAGE,
$encoder);

$backend
->Stroke($data);
This would then create the image shown in figure 1 below.
![]()
Figure 1. PDF417 barcode for "PDF-417"
As you can see from the code above the basic interface to the library makes use of one abstract factory to create the appropriate output backend. This design makes the addition of new output formats transparent for the end user of the library.
If you instead wanted to specifically encode the data with 8-columns
and using error detection level 5 you would have to modify the above
script as
 // Setup some data

$data = 'PDF-417';

// Create a new encoder

$columns
 = 8;    // Use 8 data (payload) columns

$errlevel
 = 5;    // Use error level 5

 $encoder
 = new PDF417Barcode
($columns,$errlevel);

// Create an image backend

$backend
 = PDF417BackendFactory
::Create(BACKEND_IMAGE,
$encoder);

$backend
->Stroke($data);
![]()
Figure 2. PDF417 barcode for "PDF-417" with 8 data
columns and level 5 error encoding.
This would give a more robust version of the data (which better can handle damages on barcode tags) on the expense of the size of the barcode.
2.3.1 Adjusting the output
As mentioned in the introduction you have some flexibility in how the generated barcodes is formatted. Two common modifications is to either change the module width used (=the width of a unit line in the bar) or add the printing of the human readable version of the data string below the barcode.
To adjust the module width you make use of the SetModuleWidth()
method of the backend. So for example to augment the previous example
and change the module width to 2 and have the human readable text we
would change the code to
 // Setup some data

$data = 'PDF-417';

// Create a new encoder

$columns
 = 8;    // Use 8 data (payload) columns

$errlevel
 = 5;    // Use error level 5

 $encoder
 = new PDF417Barcode
($columns,$errlevel);

// Create an image backend

$backend
 = PDF417BackendFactory
::Create(BACKEND_IMAGE,
$encoder);

$backend
->Stroke($data);

Figure 3. Increasing the module width to '2' and
adding human readable text.
A note on the module width might be in order here. For image type backends this specifies the number of pixels used for a module and for Postscript (and Encapsulated PS) this specifies the width in points (i.e. 1/72 inch). This also means that for image type backends only integer values makes sense.
You should keep in mind that depending on the quality of the printer (and paper) very small module width might not be readable with all barcode readers. For images it is therefore recommended to use "2" pixels as the minimum module width and for postscript output the minimum recommended width is "0.8" pt.
2.4 Specifying the PDF417 parameters
Note. The following section is not meant as a general introduction to the way PDF417 barcode is specified. It assumes that the reader has a basic understanding of the nature of PDF417 encoding. This section will focus on how to make use of the methods in the library to specify the various settings for the PDF417 barcodes.
2.4.1 Specifying encoding and input data
The absolute simplest way of encoding data is simply to create a simple string representing the data to be encoded and then pass that string as the first argument to the Stroke() method in the backend. This will make the JpGraph barcode module analyze the data and choose the most efficient space saving encoding for that particular data.
The PDF417 standard stipulates 3 different compaction schemas that can be used to minimize the number of codewords used for a particular data string. The available compaction modes are:
- Alpha compaction mode (also known as Text compaction mode). Efficient encoding of ASCII 32-126, (inclusively) i.e. the normal alphabet including numbers. Encodes 1.8 characters per codeword.
- Numeric compaction mode. Efficient encoding of numeric data. For long consecutive strings of digits this gives a better compaction than the alpha mode. Numeric compaction encodes about 2.9 digits per codeword.
- Byte compaction mode. The least efficient encoding of them all. Used only when there is a need to encode byte values as is, i.e. values in the range 0-255. Please note that many barcode readers, especially those with a keyboard wedge, don't send back the proper encoding for ASCII values lower than 32 or higher than 126. Byte compaction mode encodes roughly 1.2 byte per codeword.
When the Automatic encoding is chosen this will also the optimum encoding (from a size perspective) of the supplied data. This includes shifting encoding method in the middle of the data one or several time depending on the data. This means that it might start by compacting the data according to the Alpha compaction schema but if it encounters a long numeric data string it will switch to Numeric compaction mode.
However, some applications stipulates that a specific compaction mode shall be used regardless whether it is the most optimal or not. Therefore it of course possible to specify exactly what schema you want to use.
Since the application might dictate that several modes shall be used the way one determines this is by supplying a 2-dimensional data input array. This array in principle works by specifying the specific compaction mode for each part of the data.
The way the compaction mode is specified is by using one of the following predefined constant
- USE_TC, Use Text compaction schema
- USE_NC, Use Numeric compaction schema
- USE_BC, Use Byte compaction schema
Each section of data must therefore have the compaction mode specified. An example will clarify how this is works.
Example 1:
In the following example we will assume that you want to encode the
data string $data="1234567890" If you want to use the automatic
encoding then you would simply send in the string as is, i.e.
 ...

$e->Stroke(
$data);
If you instead wanted to make sure only alpha mode (text) compaction
schema is used then you would have to create a 2-dimension array as
 $newdata = array(array(
USE_TC,$data));

...

$e->Stroke(
$newdata);
In the above example we used the constant USE_TC (short for use-text-compaction). This will then force the second element to be encoded using only text compaction.
If you instead wanted to enforce numeric compaction you would have
to change the script to
 $newdata = array(array(
USE_NC,$data));

...

$e->Stroke(
$newdata);
Can you spot the difference? The only change is that we now specified USE_NC (short for use-numeric-compaction). This will force the second element to be encoded using numeric compaction schema.
We will come back to the usage of byte compaction mode since it has one additional complicating factor.
In the above example we just used a single compaction schema, what then if your application requires you to use multiple schemas? Well, that is no problem. We just split our data for each of the compaction mode we want to use and create an input array. An example will make this clear.
Example 2:
We will assume that we want to encode the string "1234abc567" by
using numeric compaction for the first 4 digits, then use text
compaction for the three letters and finally go back to numeric
compaction schema for the last three digits. For this to work we would
have to create an input array as is shown below.
 $newdata = array(array(
USE_NC,"1234"),array(USE_TC
,"abc"),array(USE_NC,
"567"));

...

$e->Stroke(
$newdata);
2.4.1.1 Using byte compaction mode
In the section above we stated that byte compaction is slightly
different. The reason for this is that we need, for technical reasons,
specify if the size (length) of the data to be encoded is an even
multiple of 6 or not. Hence, we have to Byte code compaction schemas
USE_BC_E6 (for even multiples of 6) and USE_BC_O6 (for odd
data). So to encode some specific data using byte compaction mode the
following code would have to be used
 $even6 = (
strlen($data)%6
===0);

$newdata
 = array(array( $even6
 ? USE_BC_E6 : USE_BC_O6,
$data));

...

$e->Stroke(
$newdata);
Please again note that most keyboard wedge barcode scanners do not handle byte values < 32 or > 127 properly.
2.4.2 Adjusting the number of data columns
PDF417 barcode is made up of a number of rows and columns. The library allows you to specify your wanted number of columns and it will then determine the necessary number of rows to hold all the data. (and the error correction information). Since each row has some overhead (start/stop, sync codewords) you will minimize the overall area taken by the barcode if you try to use as many columns as possible. The standard will allow for up to 30 columns to be used.
However, it should be noted that there is often a physical limitation to the maximum width that a scanner can read. Depending on how the output is layed out this needs to be taken into consideration.
2.4.3 Adjusting the error level
All PDF417 barcodes have a minium of two error detection codewords. Above that the user is free to specify a higher level of not only error detection but also error correction.
The error level specification determines how much redundancy is added in the barcode label. A high level of redundancy ensures that a partially damaged barcode can still be correctly read by the barcode scanner. The downside is of course that the higher the error level the bigger the barcode label gets. Another restriction one must be aware of is that the total number of codewords (boat data and error correction) can not exceed 925. This means that the more error correction codewords the less is available for the payload.
| Error level | Error correction codewords | Maximum payload |
|---|---|---|
| 0 | 2 | 923 |
| 1 | 4 | 921 |
| 2 | 8 | 917 |
| 3 | 16 | 909 |
| 4 | 32 | 893 |
| 5 | 64 | 861 |
| 6 | 128 | 797 |
| 7 | 256 | 669 |
| 8 | 512 | 413 |
The recommended minimum error level is a dependent on the payload size and is given in table 2 below.
| Data codewords | Recommended error level |
|---|---|
| 1 to 40 | 2 |
| 41 to 160 | 3 |
| 161 to 320 | 4 |
| 321 to 863 | 5 |
Please note that the number of codewords is not the same thing as, for example, the number of digits or letters in a string to be encoded. Depending on the chosen encoding the number of symbols per codeword is > 1. For example in numeric compaction mode (encoding) each codewords encode, on average, 2.93 digits.
The error level in JpGraph is specified as an integer in the range
[0-8] inclusively and can be specified when creating a particular
encoder. For example the code
 // Use 10-columns for data

$columns
=10;

// Create a new encode using the
 default error correction

$encoder
 = new PDF417Barcode
($columns);
uses the default error correction (2). While the following specifies
and error correction level of 6
 $columns=10; // Use 10-columns for
 data

$errlevel
=6; // Error correction level 6


// Create a new encode using the default error correction

$encoder
 = new PDF417Barcode
($columns,$errlevel);
In addition to specifying the number of data columns and error level in the creation of the encoder it is also possible to adjust them afterwards. For example, one might want to create the encoder in the beginning of a script and then use the same encoder with different settings controlled by, for example, entries in a DB.
The two encoder methods SetErrLevel() and SetColumns()
are used for this purpose. The code snippet below does the exact same
things as the code snippet above but using these two methods efter the
encoder has been instantiated
 $columns=10; // Use 10-columns for
 data

$errlevel
=6; // Error correction level 6


// Create a new encode using the default error correction

$encoder
 = new PDF417Barcode
();

$encoder
->SetColumns($columns);

$encoder
->SetErrLevel($errlevel);
2.4.4 Truncated PDF417
Warning: Not all PDF417 barcode readers can handle truncated PDF417
In situations where the physical size of the label is restricted one might use the truncated version of the PDF417 code. This works by simply stripping of some redundant information in the right side of the barcode. This will of course also make the barcode more sensible for damage.
The two images below shows a normal version together with the truncated version (both barcodes encode the same information).

Figure 4a. Normal PDF417 | 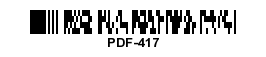
Figure 4b. Truncated PDF417 |
You can specify that you want to use truncated output using the
method SetTruncated() as the following example shows
 $columns=10; // Use 10-columns for
 data

$errlevel
=4; // Error correction level 4

$truncated
=true

// Create a new encode using the
 default error correction

$encoder
 = new PDF417Barcode
();

$encoder
->SetTruncated
($truncated);

$encoder
->SetColumns($columns);

$encoder
->SetErrLevel($errlevel);
2.5 Adjusting the output
This section deals with the way you can adjust the visual quality and appearance of the output.
2.5.1 Output format
By choosing the appropriate backend you can choose to generate the barcode label as either an image (in either PNG or JPEG format) or as Postscript (both standalone and Encapsulated postscript) . For images the PNG is strongly recommended and used by default. The reason is that PNG is a non-destructive format and will ensure the maximum quality of the barcodes while JPEG is not well suited for this type of applications since it is a destructive format.
This choice is being made by creating the appropriate backend. The
backend is created by calling the factory method
PDF417BackendFactory::Create() specifying what type of backend and
what encoder to use. The following code snippet shows how to create a
suitable backend to create PNG images
 // Create a new encode using the
 default error correction

// and columns

$encoder
 = new PDF417Barcode
();

$e = PDF417BackendFactory::Create(
BACKEND_IMAGE,
$encoder);
You could also, if you application requires it have one encoder and
two different backends as the following example shows
 $date='ABC123';

$file=' ...';
 // Some filename to write the PS file to

// Create a new encode using the default error correction

// and columns

$encoder
 = new PDF417Barcode
();

$eImg = PDF417BackendFactory::Create(
BACKEND_IMAGE,
$encoder);

$eEPS = PDF417BackendFactory::Create(
BACKEND_EPS,
$encoder);

$eEPS->Stroke(
$data,$file);

$eImg->Stroke(
$data);
The code snippet above will use the same encoder to drive both the image and the postscript backends.
2.5.2 Summary of user settings to specify output
In the list below is a short description of the available possibilities to change the output. For a more detailed explanation of the parameters for each method please consult the method reference in the end of this manual.
- Specifying the module width. The module width for the barcode is user selectable, For images this specifies the number of pixels for the module and for Postscript output this specifies the number of points (1/72 inch).
- Specifying the width/height factor Specify the height of each individual row in the barcode as a multiple of the width. By default the height is 3x the width.
- Specifying background and foreground color The foreground color and the background color for the barcodes are user selectable. The colors can be specified as any of JpGraphs builtin colors.
- Adding human readable text This is an extension to the PDF417 standard. This adds a plaintext string of the data that has been encoded under the barcode. This is useful when debugging applications to make sure that the right values have been read, for example, from a DB.
- Rotating 90 degrees (Vertical output) This enables the barcode to be printed vertically.
- Scaling the image The resulting barcode images can be scaled by an arbitrary factor.
2.6 Putting it all together
In the example directory in the distribution you can find many more
examples on how to create barcodes. As a good start the following
(simple) template may be used
 $data = 'PDF-417';


// Setup some symbolic names for
 barcode specification

$columns
 = 8;    // Use 8 data (payload) columns

$errlevel
 = 4;    // Use error level 4

$modwidth
 = 2;    // Setup module width (in pixels)

$height
 = 3;    // Height factor

$truncated
 = false; // Don't truncate

$showtext
 = true;  // Show human readable string


// Create a new encoder and backend to generate PNG images

$encoder
 = new PDF417Barcode
($columns,$errlevel);

$encoder
->SetTruncated
($truncated);

$e = PDF417BackendFactory::Create(
BACKEND_IMAGE,
$encoder);

if( $e )
 {

    $e->SetModuleWidth(
$modwidth);

    $e->SetHeight(
$height);

     $e
->NoText(!$showtext);

    $r = $e->
Stroke($data);

}

else {

    die('Can'
t create PDF417 encoder.'
);

 }
In a real life situation you would probably use your own error handling and read the data from a DB but the above skeleton outlines the general usage.
3 Method reference
In the following section all publically available methods are described. Each method is listed with parameters and default values.
3.1 Encoder methods
All encoder methods are accessed on the encoder which first has to be
instantiated by creating a instance of the class PDF417Barcode()
as the following example shows
 $encoder = new
 PDF417Barcode();

$encoder
-> ...
3.1.1 PDF417Barcode($aNumCols=10,$aErrLevel=2)
Purpose:
To create a new PDF417 encoder with a chosen number of columns and error level. Please note that these parameters can also be adjusted using the methods described below.
Returns:
A new encoder which is used by the backend to generate the barcode
label.
Example:
 $encoder = new
 PDF417Barcode(
20);
Note:
3.1.2 SetColumns($aCols)
Purpose:
Specify number ber of data columns. This should be a value in the range [2-30] (inclusively)
Example:
 $encoder = new
 PDF417Barcode();

$encoder
->SetColumns(20);
Note:
The number of rows will be automatically adjusted to fit the data
and the error correction codewords as specified by the error level
setting. The number of rows is not directly user configurable.
3.1.3 SetErrLevel($aErrLevel)
Purpose:
Specify the chosen level of error correction.
Example:
 $encoder = new
 PDF417Barcode();

$encoder
->SetErrLevel(5);
Note:
A high error level will limit the number of payload data since the
total number of data in the label is fixed.
3.1.4 SetTruncated($aTrunc=true)
Purpose:
Specify that the barcode label should be truncated. This will make
the label slightly narrower and might be used where the physical space
is at premium.
Example:
 $encoder = new
 PDF417Barcode();

$encoder
->SetTruncated
();
Note:
Not all barcode scanners can handle truncated PDF417.
3.2 Backend methods
The backend is responsible for the actual output of the barcode label. It is possible to either create an image or a postscript backend. All barcode scripts must create a suitable backend. In the creation of the backend the previous created encoder (front end) is given as the second argument. The actual output from the script (to create the barcode label) is done with a call to the Stroke() method in the backend. As usual this call should be the last line in the script if it is used to send the image back to the browser.
One should always include a check that the backend has been successfully created before trying to use any methods on the object as the following short template illustrates.
Example:
 $encoder = new
 PDF417Barcode(
$columns,
$errlevel);

$e = PDF417BackendFactory::Create(
BACKEND_IMAGE,
$encoder);

if( $e )
 {

    // .. Output formatting

    $e->Stroke();

}
In the example above we have chosen to create an image encoder (specified by constant BACKEND_IMAGE) by default the image format used will be PNG which is also the recommended format.
3.2.1 Methods common to all backends
3.2.1.1 Stroke($aData,$aFile='')
Purpose:Encode a specific data string entered as the first argument and send the barcode output, depending on backend, either directly back to the browser as an image or return the Postscript representation as a string.
If a valid file name is specified the image will be written directly to that file instead.
3.2.1.2 SetVertical($aFlg=true)
Purpose:This will make the barcode label rendered vertical instead of horizontal
Example:
 $encoder = new
 PDF417Barcode(
$columns,
$errlevel);

$e = PDF417BackendFactory::Create(
BACKEND_IMAGE,
$encoder);

if( $e )
 {

    $e->SetVertical();

    $e->Stroke();

}
Note:
3.2.1.3 SetScale($aScale)
Purpose:Will arbitrary scale the generated barcode image. Scale factor is specified as a floating point number .
Example:
 $encoder = new
 PDF417Barcode(
$columns,
$errlevel);

$e = PDF417BackendFactory::Create(
BACKEND_IMAGE,
$encoder);

if( $e )
 {

    $e->Scale(
2.5);  // Make
 the barcode 2.5x bigger

    $e->Stroke();

}
Note:
See also SetModuleWidth() below.
3.2.1.4 SetModuleWidth($aWidth)
Purpose:Specifies the module width to be used in the barcode. The module width is interpretated differently depending on whether it is applied on an image or a postscript backend. The module width will determine the physical width of the overall barcode. Please make sure that the printer you intend to use has good enough resolution to handle the chosen module width.
For image backends is specifies the number of pixels to be used for the width of one module in the barcode. You may think of the module as the thinnest line printed in the barcode. Even though most modern inkjet printers (2003 and later) can resolve modules down to 1 pixels it is recommended that for inkjet printers a module width of >= 2 is used. Your mileage may vary.
For Postcript backend the module width specified the width in Postscript points (1 point = 1/72 inch).
Example:
 $encoder = new
 PDF417Barcode(
$columns,
$errlevel);

$e = PDF417BackendFactory::Create(
BACKEND_IMAGE,
$encoder);

if( $e )
 {

    $e->SetModuleWidth(
2);

    $e->Stroke();

}
Note:
You can fine tune the barcode image by applying an overall scaling
constant as specified with the method SetScale().
3.2.1.5 SetHeight($aHeight)
Purpose:Specified the height to width ratio for the individual rows in the barcode. By default the ratio is 3, which means that the height of the rows in the barcode is 3x the module width. Most scanners can handle a factor between 2-5. You should very rarely have to change this parameter. The ratio is specified as an integer.
One reason to change this to a smaller value is of course to make a barcode label take up less vertical space.
Example:
 $encoder = new
 PDF417Barcode(
$columns,
$errlevel);

$e = PDF417BackendFactory::Create(
BACKEND_IMAGE,
$encoder);

if( $e )
 {

    $e->SetHeight(
2);

    $e->Stroke();

}
Note:
Please keep in mind though that not all barcode scanners is good at
handling very small ratios.
3.2.1.6 SetColor($aFrgColor,$aBkgColor)
Purpose:Specify the foreground and background color for the barcode.
Example:
 $encoder = new
 PDF417Barcode(
$columns,
$errlevel);

$e = PDF417BackendFactory::Create(
BACKEND_IMAGE,
$encoder);

if( $e )
 {

    $e->SetColor(
'black',
'lightyellow');

    $e->Stroke();

}
Note:
To invert the barcode label specify a foreground color as 'white'
and background color as 'black'.
3.2.1.7 ShowFrame($aFlg=true)
Purpose:Draw a 1 pixel frame around the barcode. This is not recommended in production since it might disturb some scanners reading. This is only useful if you need a visual feedback on the boundaries for the image.
Example:
 $encoder = new
 PDF417Barcode(
$columns,
$errlevel);

$e = PDF417BackendFactory::Create(
BACKEND_IMAGE,
$encoder);

if( $e )
 {

    $e->SetFrame();

    $e->Stroke();

}
Note:
3.2.1.8 NoText($aFlg=true)
Purpose:Show human readable text of the encoded data underneath the barcode label.
Example: See below.
Note:
This is an extension specific to JpGraph and human readable text
is not part of the official PDF417 standard. There are usually no
problem of including this text but it is not recommended to do so in a
production environment. This is mostly useful when debugging an
application and to make it easer to see that the correct data is
encoded as a barcode label.
3.2.1.9 SetFont($aFontFam,$aFontStyle,$aFontSize)
Purpose:Specify the font for the human readable text underneath the barcode label.
Example:
 $encoder = new
 PDF417Barcode(
$columns,
$errlevel);

$e = PDF417BackendFactory::Create(
BACKEND_IMAGE,
$encoder);

if( $e )
 {

    $e->Notext(
false);  //
 Show text

    $e->SetFont(
FF_ARIAL,
FS_NORMAL,8);

    $e->Stroke();

}
Note:
3.2.2 Methods only for use with image backends
3.2.2.1 SetImgFormat($aFormat)
Purpose:Specify image format as either PNG (default) or JPEG (not recommended). Possible values are
- "auto"
- "png"
- "jpeg"
- "gif". Note: This is usually not supported by your installation of PHP due to copyright issues with the GIF format.
Example:
 $encoder = new
 PDF417Barcode(
$columns,
$errlevel);

$e = PDF417BackendFactory::Create(
BACKEND_IMAGE,
$encoder);

if( $e )
 {

    $e->SetImgFormat(
"jpeg");

    $e->Stroke();

}
Note:
Since JPEG is a destructive coding it might yield artifacts in the
barcode mage due to the very high spatial frequencies in a typical
barcode label.
3.2.3 Methods only for use with Postscript backends
3.2.3.1 SetEPS($aFlg=true)
Purpose:Format the output as Encapsulated Postcript. This adds a bounding box information to the output and makes this format suitable to be included in other postscript files.
Example:
 $encoder = new
 PDF417Barcode(
$columns,
$errlevel);

$e = PDF417BackendFactory::Create(
BACKEND_PS,
$encoder);

if( $e )
 {

    $e->SetEPS();

    $e->Stroke();

}
Note:
4 Example script
The following section shows a number of fully working scripts that can serve as templates for your own development.4.1 Example 1: Default values
Purpose:
Show how to create the simplest possible barcode using just default values and send the generated barcode back to the browser as an image.
Script:
 <?php

require_once(
'../../jpgraph.php');

require_once(
'../../jpgraph_canvas.php');

require_once('../jpgraph_pdf417.php');


// Simplest possible PDF417 barcode
 using just default values


$data = 'PDF-417';


// Create a new encoder and backend
 to generate PNG images

$backend
 = PDF417BackendFactory
::Create(BACKEND_IMAGE,new PDF417Barcode());

$backend
->Stroke($data);


?>
Output:
![]()
4.2 Example 2: Basic parameter settings
Purpose:
Show how to manipulate the most common user selectable parameters.
Script:
 <?php

require_once(
'../../jpgraph.php');

require_once(
'../../jpgraph_canvas.php');

require_once('../jpgraph_pdf417.php');


$data = 'PDFf-417';


// Setup some symbolic names for
 barcode specification


$columns
 = 8;    // Use 8 data (payload) columns

$errlevel
 = 2;    // Use error level 2 (minimum recommended)

$modwidth
 = 2;    // Setup module width (in pixels)

$height
 = 3;    // Height factor


// Create a new encoder and backend to generate PNG images

$encoder
 = new PDF417Barcode
($columns,$errlevel);

$e = PDF417BackendFactory::Create(
BACKEND_IMAGE,
$encoder);


if( $e )
 {

    $e->SetModuleWidth(
$modwidth);

    $e->SetHeight(
$height);

    $r = $e->
Stroke($data);

}

else {

    die('Cant create PDF417 encoder.');

 }

?>
Output:
![]()
4.3 Example 3: Showing human readable text
Purpose:
Show how to add human readable text under the barcode.
Script:
 <?php

require_once(
'../../jpgraph.php');

require_once(
'../../jpgraph_canvas.php');

require_once('../jpgraph_pdf417.php');


$data = 'PDF-417';


// Setup some symbolic names for
 barcode specification


$columns
 = 8;    // Use 8 data (payload) columns

$errlevel
 = 4;    // Use error level 4

$modwidth
 = 2;    // Setup module width (in pixels)

$height
 = 2;    // Height factor (=2)

$showtext
 = true;  // Show human readable string


// Create a new encoder and backend to generate PNG images

$encoder
 = new PDF417Barcode
($columns,$errlevel);

$e = PDF417BackendFactory::Create(
BACKEND_IMAGE,
$encoder);


if( $e )
 {

    $e->SetModuleWidth(
$modwidth);

    $e->SetHeight(
$height);

     $e
->NoText(!$showtext);

    $r = $e->
Stroke($data);

}

else {

    die('Cant create PDF417 encoder.');

 }

?>
Output:

4.4 Example 4: Altering colors
Purpose:
Show how to add user specified foreground and background colors.
Script:
 <?php

require_once(
'../../jpgraph.php');

require_once(
'../../jpgraph_canvas.php');

require_once('../jpgraph_pdf417.php');


$data = 'PDF-417';


// Setup some symbolic names for
 barcode specification


$columns
 = 8;    // Use 8 data (payload) columns

$errlevel
 = 4;    // Use error level 4

$modwidth
 = 2;    // Setup module width (in pixels)

$height
 = 2;    // Height factor (=2)

$showtext
 = true;  // Show human readable string


// Create a new encoder and backend to generate PNG images

$encoder
 = new PDF417Barcode
($columns,$errlevel);

$e = PDF417BackendFactory::Create(
BACKEND_IMAGE,
$encoder);


if( $e )
 {

    $e->SetModuleWidth(
$modwidth);

    $e->SetHeight(
$height);

     $e
->NoText(!$showtext);

    $e->SetColor(
'black',
'yellow');

    $r = $e->
Stroke($data);

}

else {

    die('Cant create PDF417 encoder.');

 }

?>
Output:

4.5 Example 5: Creating postscript output
Purpose:
Show how to generate Postscript output. Running this script will
send back the raw postscript file to the browser as an illustration.
Script:
 <?php

require_once(
'../../jpgraph.php');

require_once(
'../../jpgraph_canvas.php');

require_once('../jpgraph_pdf417.php');


$data = 'PDF-417';


// Setup some symbolic names for
 barcode specification


$columns
 = 8;    // Use 8 data (payload) columns

$errlevel
 = 4;    // Use error level 4

$modwidth
 = 0.8;// Setup module width (in PS points)

$height
 = 3;    // Height factor (=2)

$showtext
 = true;  // Show human readable string


// Create a new encoder and backend to generate PNG images

$encoder
 = new PDF417Barcode
($columns,$errlevel);

$e = PDF417BackendFactory::Create(
BACKEND_PS,
$encoder);


if( $e )
 {

    $e->SetModuleWidth(
$modwidth);

    $e->SetHeight(
$height);

     $e
->NoText(!$showtext);

    $e->SetColor(
'black',
'yellow');

    $r = $e->
Stroke($data);

    echo nl2br
(htmlspecialchars
($r));

}

else {

    die('Cant create PDF417 encoder.');

 }

?>
Output: (A postscript file, actual output omitted from this manual. Please run the example.)
4.6 Example 6: Manually selecting compaction schema
Purpose:
To show how to manually specify the compaction schema to be used for the input data. The example below shows how to manually specify when to use numeric and when to use text mode.
Script:
 <?php

require_once(
'../../jpgraph.php');

require_once(
'../../jpgraph_canvas.php');

require_once('../jpgraph_pdf417.php');


$data1 = '12345';

$data2 = 'Abcdef';

$data3 = '6789';


$data =
 array(

    array(USE_NC
,$data1),

    array(USE_TC
,$data2),

    array(USE_NC
,$data3));


//$data = "12345Abcdef6789";


// Setup some symbolic names for barcode specification


$columns
 = 8;    // Use 8 data (payload) columns

$modwidth
 = 2;  // Use 2 pixel module width

$errlevel
 = 2;    // Use error level 2

$showtext
 = true;  // Show human readable string


// Create a new encoder and backend to generate PNG images

$encoder
 = new PDF417Barcode
($columns,$errlevel);

$e = PDF417BackendFactory::Create(
BACKEND_IMAGE,
$encoder);


if( $e )
 {

    $e->SetModuleWidth(
$modwidth);

    $e->NoText(!
$showtext);

     $e
->Stroke($data);

}

else {

    die('Can\'t create PDF417
 encoder.');

 }

?>
Output:

5 Example application
The example application is a WEB-based application that serves three purposes- It will give you an easy way to create single PDF417 barcodes
- It can serve as an experimental platform to find out what paramaters that you want to use in your own applications.
- It shows you a real world slightly more complex use of the library.
You run the application by simply using your favourite browser and point it to the PDF417 demo directory ( "jpgraph/src/pdf417/demoapp/" ). You will then see two frames, a entry form on the left and the actual output on the right.
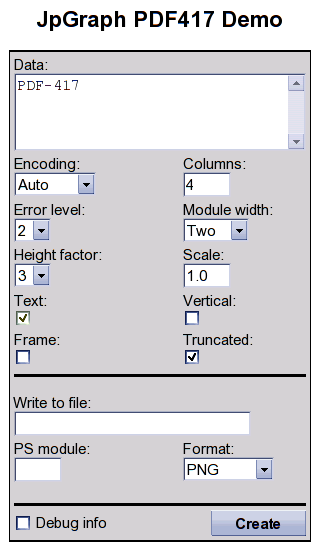
| Description of Fields:
|